Low Fat GLUTEN Free Zucchini Carrot Apple Muffins


IMG_0589 Zucchini Carrot Apple Muffins Gluten Free
Holy Yum!  I have to be honest, my daughter has gone gluten free and I rarely like gluten free recipes as much as the ones with lovely wheat flour.

I do not like these just because they are gluten free, but I LOVE knowing I’m feeding them fruits and veggies in a tasty hidden package!  FYI, if you don’t care about the gluten, exclude the GF flour, chia and Coconut flour and use 1 1/2 cup wheat flour instead.

This one is a fabulous unexpected exception!  We have been playing around with our favorite recipes and updating them to be gluten free, so stay tuned for more!

INGREDIENTS

  • 1.5 cup shredded zucchini (excess water removed)
  • 1 cup shredded apple (excess water removed)
  • 1 cup shredded carrot (excess water removed)
  • 8 Tbsp butter, melted
  • 1/2 cup applesauce (I only had a berry squeezer on hand last time and 4 tablespoons did the trick and I could not tell the difference:)
  • 1 cup sugar
  • 4 eggs
  • 2 tsp vanilla
  • 2 cups gluten free flour (I used Red Mill)
  • 3 TBSP Coconut Flour
  • 1 1/2 TBSP Chia Seeds (helps with binding muffins when GF flour is used)
  • 1tsp baking soda
  • tsp baking powder
  • 2 tsp cinnamon
  • 1 cup of chocolate chips if desired (gluten free if you choose)

INSTRUCTIONS

  1. Mix first 8 ingredients in a large bowl and stir until well combined.
  2. Add remaining ingredients except chocolate and stir until just mixed.
  3. Add chocolate chips if you want them (could use raisin or another dried fruit, the chocolate chips add some yum that pleases the kids and mom too)  You can add more if you want them more chocolatey too…
  4. Scoop into greased muffin tins. Make them about 3/4 full:)
  5. Bake at 350 degrees F for 20 minutes for regular sized muffins (about 12 for mini) or until toothpick inserted into center comes out clean.

I made a combination of mini and regular muffins and this make 12 regular and 24 mini.  You can half the recipe if you don’t want quite so many:)  These go into our refrigerator and last a good week…I will try freezing next time too.

Peanut Butter Reese’s Ice Cream Pie


IMG_2555

Cheater Cheater Peanut butter pie eater, this recipe is so SIMPLE it feels like cheating!  It gets rave reviews all around.

This recipe can be done two ways, one is simple the other is CRIMINAL SIMPLE.  If your store stocks Ben and Jerry’s Peanut Butter cup  ice cream, you can skip even stirring for this recipe.  If not, invest in a good quality pint of vanilla ice cream–I always use Haagen Dazs when I can’t locate the Ben and Jerry’s flavor.

Just in time for the Fourth of July and your summer barbecues, this is a sure to please choice.


INGREDIENTS:

For the Crust:

Graham Cracker Pie Crust (I buy the pre-made version at the store)

3 TBSP heaping of creamy Peanut butter


Filling:

Option 1–the criminally simple:

1 Pint Ben and Jerry’s Peanut Butter Cup Ice Cream

OR

Option 2–simply simple:

1 Pint Premium (think Haagen Dazs or similar, it is worth it) Vanilla Ice Cream

1/2 Cup Creamy Peanut Butter

3/4 Cup of Reese’s Peanut butter cups chopped with some larger chunks present OR the same amount of the mini cups cut in a variety of sizes (some chopped small with some larger chunks)

Topping:

1 Can Whipped Cream (you won’t use it all)

1-2 Reese’s cups diced–amount is preference, I often use 1 per pie if I am making two pies as it is one store packages bar


Directions:

  1.  Set you ice cream out of soften so it will be easy to remove from the pint
  2.  Prepare your crust by dropping 3 TBSP of peanut butter on to the crust and lightly spreading it with the end of you knife.  Just the bottom of the pie will do.

IMG_2554

3.  If you are using the Ben and Jerry’s Peanut butter cup ice cream pint, simply squeeze the pint onto the crust and let it slowly begin to melt until it softens so that you can spread it across the whole pie.  Do not worry if it gets quite soft, you will be getting it back into the freezer soon!  If you are using Vanilla Ice Cream simply place the pint of ice cream into a large mixing bowl, add your chopped candy and 1/2 cut peanut butter and mix until combined.  Dump mixture into the pie crust, spread evenly and move on to step 4.

4.  Sprinkle the extra 1-2 chopped Reese’s across the middle portion of the pie, just stay about 1/2-1 inch from the edges so you can add the whipped cream.

5.  Place your pie in the freezer until set again, only takes about 15 minutes.

6.  Before serving, add the whipped cream around the outside and a puff in the middle.  If you are taking this to go, simply do this when it is reset but if you are able to do it RIGHT before serving, it looks prettiest.

7.  Cut into 8 slices and serve!  Sit back and enjoy the compliments:)


Adobo Lime Chicken & Quinoa Chopped Salad with Pineapple

I know.  Crazy combo?  Not at all!  This was a major hit and perfect for a warm (OK, off the charts hot) summer night.  It is light and refreshing and would pair great with a margarita or a nice cold Corona light…

I am confident you will love it and that I will be making it again soon!

IMG_2402
First things first you want to marinate your chicken.  IF you can find just adobo sauce, awesome, but I often just grab a can of chipotle in adobo sauce and use that.  I will keep a chipotle in the marinade for a bit and grill a few for the spice lovers (like me:) Here’s a photo of my precooked marinating chicken.


Here are some pictures of our romaine ready to go as well as our “fixing” set aside.
IMG_2399.JPG
IMG_2400
Whisk up your dressing and adjust the flavors to you liking…
IMG_2397
Chipolte Lime Chicken
2 chicken breasts
5 tbsp of the adobo sauce from one can chipoltes in adobo
1 lime, juiced
1/4 tsp sea salt
Salad
About 1 Cup prepared quinoa (make about 1/2 cup uncooked)
4 cups lettuce, chopped (I used Romaine)
1 Small Pineapple chopped, or done in rings using a corer if you prefer
1 cup grape tomatoes
1/3 cup red onion, finely chopped
1 avocado, cubed
Lime Vinaigrette
1/3 cup Extra Virgin olive oil
1/4 cup apple cider vinegar
2 limes, juiced
2 tsp honey
Bit of sea salt
Instructions
1. Heat the grill
2. Season chicken with salt and pepper
3. In a bowl or marinade dish, combine chipolte and lime
4. Add chicken and let marinade in the fridge for at least 20 minutes–extra time only helps with the flavor
5. Prepare the 1/2 cup quinoa according to the package directions–you can up this if you want a more grain filled dish.
5. Add chicken to grill
6. Cut pineapple either in chunks (or into slices with a corer if you would like–this way you can add to the grill, grill for 3-4 minutes on each side–I thought it great ungrilled)
7. While you aregrilling–or your spouse or friend handles that part:), chop your lettuce, avocado, tomato, and red onion (You will notice that I added these items on a seperate plate at our house so everyone could  build their own–the photographed  (and tastiest if you ask me) salad includes all the ingredients.
8. Whisk together dressing, check the flavor and add salt, lime or honey to your liking–stick in the fridge until you are ready.
9. Once chicken is done cooking, dice it and put together your salad.  You might choose to keep the “fixing” aside for everyone to assemble to taste for a picky family dinner or just toss it to serve~keep it un-tossed first so everyone can see how pretty it is or serve plated and un-tossed for the same effect:)

Week 7: Chicken Cordon Bleu Casserole with sauce for serving

cdp

My husband really loves chicken cordon bleu.  I tried this casserole idea out thinking maybe we could get the taste he loves, the easy recipes I like AND try to cut down on some of the carbs at the same time…he said, this is seriously the best thing you have made in a long time.  He likes a lot of what I try, so that is saying something!  Go ahead and double the golden round (ritz) crackers if you don’t mind the extra carbs:)  You can skip the sauce, but I don’t suggest it…it is AMAZING!

INGREDIENTS

4 boneless, skinless chicken breasts, cut in half and crosswise

8-10 slices of thin sliced ham

6 swiss cheese slices

3 Tbsp. butter, melted

1/2 cup of Ritz crackers, crushed

1/2 cup of grated parmesan cheese

1/2 tsp. salt

1/8 tsp. pepper

INGREDIENTS FOR SAUCE

3 Tbsp. butter

3 Tbsp. flour

1 cup milk

1/2 cup chicken broth

1/2 Tbsp. Dijon mustard

1 tsp. Worcestershire sauce


DIRECTIONS

  1. Preheat the oven to 350 degrees and coat a 9 x 13 baking dish generously with cooking spray.
  2. Layer the chicken in the bottom of the baking dish. Next, layer the chicken with the ham slices and then cover the entire dish with swiss cheese slices.
  3. In a medium bowl, blend the crushed crackers, grated parmesan, and salt and pepper. Sprinkle the cracker mixture over the cheese to create the next layer.
  4. Pour melted butter over the top of the casserole and bake for 30 to 35 minutes until juices run clear and cracker crust is browned a tad.
  5. Sauce: the last ten minutes your chicken is cooking you should start your sauce.
  6. Melt the butter in a saucepan slowly.
  7. Whisk in the flour and cook for 2 minutes.
  8. Next, slowly pour in the chicken broth and milk.
  9. Whisk continuously for 5 minutes or until the sauce thickens.

Week 6: Bacon Cheeseburger “Pie” Low Carb

bcp

In an attempt to cut down on all the super tasty carbs pre-bathing suit season, I tried out something different last night in the kitchen, it was delicious and ALL FIVE PEOPLE in my house liked it, WHAT???

The best part is that I had ALL the ingredients on hand.  No trip to the store, for once, for me!

I would add more cheddar and less mozzarella next time–the choice was based only on what I had left:)

Ingredients
  • 1 1/2  pounds ground beef
  • 2/3 pounds cooked bacon
  • 1 Tablespoon Garlic Powder
  • 4 eggs
  • 1 cup mayo
  • ½ cup half and half
  • 1 1/2 cup Shredded Cheese (I used 1 cup mozzarella one 1/2 of sharp cheddar–you could use all of one or go with a medium cheddar only)
  • 1/2 teaspoon pepper
  • 1/4 tsp salt
Instructions
  1. Brown the ground beef and drain it.
  2. When 1/2 way browned add the garlic powder and the salt and pepper.
  3. Stir in 3/4 cup (1/2 the total) of the shredded cheese, leaving 2/3 cup aside for the top later.
  4. Stir in the bacon, cut into pieces, I just sliced each piece sideways in about 1/3 inch strips.
  5. Place the meat mixture into 2 9 inch pie pans.
  6. Next, whisk together the mayonnaise, half and half  and eggs.
  7. Pour the mixture over the meat and top with the remaining cheese–add a bit more if you feel it is not fully covered.
  8. Now just bake at 350 degrees for 30-35 minutes or until bubbling.
  9. A MUST–Take out of oven and let stand for 5-10 minutes before serving.

This was super good warm last night, but made tasty COLD lunch today too!!  I have to tell you, I would have loved adding some dill pickle slices on top near the end but my pickle averse family would have protested–an idea for you though!

Enjoy!

Week 5: Low Carb! Cauliflower “Shepherd’s Pie”


IMG_1926


Sometimes it is hard to come up with new recipes…so many things are just too complicated for week night or include ingredients a) my family won’t eat or b) are not going to mesh with my hopes of providing healthy dinners.  So, sometimes it is best to experiment a little bit with old recipes to turn them into something  I feel good about feeding the family.  The great thing about this recipe is that is low carb, full or protein and veggies AND MY WHOLE FAMILY LOVED IT!


It also took hardly ANY TIME!  The most involved part was washing my mini food processor.  I like the mini as it is a much easier endeavor to take out and clean up.


I am behind on posting, so let’s get to the details!

LOW CARB Cauliflower Shepherd’s Pie


First Layer:
1 lb ground beef
1/2 cup chopped onion
1 tsp salt
1/2 tsp pepper
1 clove garlic, minced
1/2 cup dry red wine
1 tbsp arrowroot starch or cornstarch
1 tbsp chopped fresh rosemary
Second Layer/Topping:
1 1/2 lbs cauliflower florets
2 garlic cloves
2 tbsp butter
1/2 tsp salt
1/4 tsp pepper
3/4-1 Cup grated sharp cheddar cheese
1 TBSP Olive Oil (if needed, see below)


First Layer:
In a large skillet over medium heat, brown the beef until cooked through–this will take about 10 minutes.   Depending on the beef you used, you may have some oil left in pan.  Remove the meat and reserve 1 TBSP of oil, I used 93% and had much less than that remaining so added a TBSP of olive oil to the pan before the next step.
Return pan to heat and add onion, salt and pepper. Cook until the onion is translucent.  This will be 4-6 minutes.  Now add 1/2 clove or 1 tsp. of minced garlic. Yes, I buy the handy glass jars sometimes.
Now, return the meat to pan. Stir arrowroot starch (or cornstarch if you have it on hand instead) into the wine and then add the mixture to the pan. Cook for about 5 minutes, you will see most of the wine has been cooked away and the mixture has thickened.  Now stir in chopped rosemary and remove the skillet from  the heat. You may add additional rosemary if you love the flavor, I kept it low as I knew my kids would enjoy some flavor but pick around the leaves themselves.
Second Layer/Topping:
As your beef is browning (if you have not already done the chopping) create you florets.  FYI, I used one medium head of cauliflower or about two cups of florets.  The head itself weighted 2 lbs.
Preheat the oven to 400 degrees.
Steam your cauliflower (a steaming basket is best, but you can boil it as well as long as you remove as much water as possible when it is complete).  This will be ready in about 6 minutes–drain it and add it to your food processor, I used the mini so I did this in two batches.  Transfer to a bowl and add your butter (melted), salt, pepper and another 1/2 clove or tsp. of minced garlic.
Put you beef layer into the bottom of a 9 by 11 baking dish and then spoon your topping layer over the top evenly.
Sprinkle the cheese over the top and bake for 20 minutes.  At the 20 minute mark, switch to broil for 3-5 minutes or until the cheese is bubbly and just starting to brown.
ENJOY!


The Experiments Week 4: WOWZER! Chicken (or Veggie) Tortilla Soup (Crockpot!)

Cold weather, cold/flu season, busy nights, entertaining–you NEED this recipe!

You've Got This Mama

Super Crockpot Chicken Tortilla Soup Super Easy Super Yummy Super Tortilla Soup ! Perfect for your Super Bowl party!!

Found On: http://www.momsweeklyrecipe.com

Holy Cow! This was delicious!  It’s no mistake that I am using this recipe right before the Super Bowl!  It is the perfect warm, filling, tasty BUT healthy dish!  This was one of those weeks where experimenting was going to be tough, too little time and too much to do.  I remembered once attempting a similar soup and decided to make my weekly experiment improving on it…I did!

Are you ready for the BEST part???

I got all my ingredients out at 12:58, had it all in the crockpot by 1:13 and had my kitchen tidied up again by 1:16.  Except for the five minutes to shred the chicken hours later, that was IT! Talk about easy, you can even prep it the night before if you are rushed in the morning.  You won’t…

View original post 345 more words

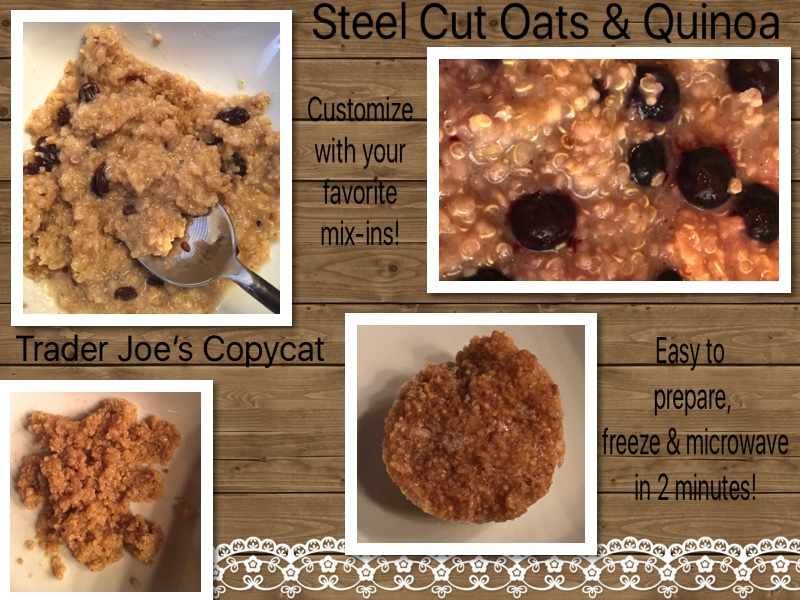
2016: Week 2! Steel Cut Oats & Quinoa Oatmeal “Bricks” Make, Freeze & Microwave–Trader Joe’s Copycat!

oatmeal collage


I LOVE to have a nice warm healthy bowl of oatmeal on a colder morning and my kids like it too.  The combination of the steel cut oats and the quinoa in this recipe keeps you full ALL MORNING LONG!  I added a bit of flax seed and will add chia next time as I as out when I made it this time around. The kids say they when they eat this in the morning they don’t get hungry before lunch (that is some BRAIN FOOD for school!) and I enjoy it the mornings before a long run and it helps sustain my energy the whole way through.

I used to buy the frozen brinks at Trader Joe’s.  At our local TJ’s the steel cut only version is $1.79 a box (just 2 servings) and the oat and quinoa version is $1.99 a box (also 2 servings).  That meant for one morning, 5 of us, I need 2 1/2 boxes.  That’s a lot of freezer space.  So, I decided to experiment and make my own.  It was AWESOME!  I “worked” the very same way, took in from the freezer, popped in in our microwave, boom!  Breakfast!

If you aren’t into quinoa, you can leave it out and just add more oats.  The quinoa really makes it even MORE filling though…

I kept the recipe very simple and it was tasty all by itself and we were all able to customize our breakfast in a few minutes.  But, you could add some items to the cups prior to freezing if you desired.  I personally like to make a game time decision…

Here are a few ways we have enjoyed this so far, let me know if you try any great combos!

-Just like it is, delicious (pictured)–occasionally a couple tablespoons of vanilla almond milk

-With Raisins  and a bit of vanilla almond milk(pictured)

-Added Frozen Blueberries halfway through cooking and then a bit of vanilla almond milk

-With banana slices, walnuts and coconut with a splash of vanilla almond milk (not pictured, child devoured it too quickly!)

So, how do you do it???

INGREDIENTS:

1/2 cup quinoa

1  1/2  cups steel cut oats

2 Tablespoons Maple Syrup

2 Tablespoons Brown Sugar

2 Tablespoons of Flax Seed (or one each of flax and chia if you desire)

DIRECTIONS:

THE MAKE AHEAD:

  1.  Cook both the quinoa and the steel cut oats according to the package directions–for the quinoa rinse first and then 1 cup water to 1/2 cup quinoa works great.  I do these two at the same time.  Two burners going at once, can you say multi-tasker??
  2. Once they are cooked, combine the oats and the quinoa in a bowl.
  3. Stir in the seeds, maple syrup and brown sugar.
  4. Spoon the mixture into a muffin pan.  Fill them each about 3/4 full. (I used regular sized instead of jumbo as I figured it would cook better in the microwave.  This size is great for the kids or if you’re having some fruit or something along side it. 2 muffins would be about the size of one from Trader Joe’s)
  5. Put the muffin pan in the freezer.
  6. Once the “muffins” are frozen, bring the pan out to sit for about 5 minutes.
  7. Use a fork to gently remove each “muffin” from the pan and place in a freezer safe container or ziplock bag.

THE DAY OF:

  1. Remove 2 “muffins” from the freezer and place in microwave safe bowl.
  2. Add 1 tsp of water to the top of each frozen muffin.
  3. Microwave for 1 minute, break up and stir.
  4. Microwave for 1 minute or 1 1/2 minutes more.  Microwave cooking times vary so you may need to add additional 30 seconds depending on yours.  You’ll figure this out with your first batch:)
  5. Add any mix ins you like and enjoy!  (remember if you add frozen fruit, do this half way through. If you want your mix-ins warm, add them near the end when there is about 30 seconds of cook time left.)


2016: Week One–Kale, Quinoa and Avocado Salad

IMG_1726
Kale, Quinoa and Avocado Salad


This is a snap to prepare, tastes great, looks pretty darn good and is good for you, too!  WIN WIN WIN!

It is the first of the year and I am guesses more than a few of us are committing to healthy lifestyle choices, or trying anyway!  This salad makes that easier!  We actually liked it enough to make it TWICE this week.  Another awesome thing about Kale is that is lasts longer in the fridge!  Most salad gets all wilty but kale stays nice (maybe even better) even with dressing for awhile!

You can always add or take away items from the salad to change it up or cater to your preferences but here is what I used:

Ingredients:

4 cups chopped Kale

1 0r 2 Avocados (I used 1 but we REALLY like that stuff so 2 might’ve been better)

Extra Virgin Olive Oil

1/2 cup grape tomatoes

2/3 cup cooked quinoa

1 or 2 lemon slices for squeezing, extra if desired for serving

2-3 Tbsp. of the Vinaigrette of your choice (I used a French Vinaigrette.  There are many recipes to make your own but Brianna’s Homestyle sells a great one if you’d prefer:)


Directions:

  1. Place the 4 cups of kale into your large mixing bowl and drizzle it with olive oil; use your hands to spread the oil throughout the kale.  Massage the kale with your fingers for a few minutes (this can help cut down on the bitterness).
  2. Prepare the quinoa according to the package directions (I cooked 1/2 cup with one cup water to achieve my 2/3 cups cooked). When it is finished, allow it to cool to room temperature.
  3. While the quinoa cooks, chop your avocado into smallish pieces, set aside.
  4. Slice your lemon and squeeze one or two wedges  over the kale and mix. (I would start with one and add a second if needed for taste or serve a wedge alongside each serving to be added as desired)
  5. Add the cooled quinoa, avocado and tomatoes to the kale.  Toss gently.
  6. Add vinaigrette (if desired, you can cut fat/calories here by simply adding extra lemon if the flavor suits you–my kids like the french vinaigrette flavor and if they eat kale salad, I am willing, happily, to comply.


Week 24: Caprese Lasagna Roll Ups without Ricotta

Caprese Lasagna Roll Ups

I DO NOT like ricotta cheese.  I love lasagna, but I omit ricotta every time and sub in fresh mozarella or cottage cheese.  I saw a lot of Caprese Roll up recipes going around, but I had to make one without the ricotta and see what it was like.

It was like, GOOD!

Ingredients:
8 lasagna noodles, uncooked
3 1/2 cups shredded, fresh mozzarella cheese, divided
1 large egg white
1/3 cup shredded, fresh Parmesan cheese
freshly ground black pepper (to taste)
3-4 medium Roma tomatoes, sliced nice and thin
1/4 cup fresh basil leaves, plus a little bit extra for garnish if you like:)
2 cup marinara sauce  (if you make your own, that is great, if you have a stand by store bought you like, that works too)

Olive Oil if desired, see below

INSTRUCTIONS

1.Cook the lasagna noodles according to package directions but be sure to keep them a bit al dente.

2. Drain pasta and place the noodles in a single layer on a large sheet of wax paper.

3. Preheat oven to 350 degrees.

4.   Prepare your filling: In a large mixing bowl, Mix about 3 cups of the Mozzarella cheese, egg and parmesan and season with ground black pepper to taste.

5. Spread a thin layer of the cheese mixture over each lasagna noodle, be sure to cover the noodle completely end to end.

6. Lay about 4 thin tomato slices over the cheese mixture and then place fresh basil leaves (about 3 each noodle) over the top.

7. Roll lasagna noodles to opposite end, make them nice and tight.

8. Spread a thin layer of marinara sauce in the bottom of a 11×7” baking dish.

9. Place lasagna rolls seam side down in dish and top each roll with a rounded tablespoonful of pasta sauce. Make sure to cover the edges of the pasta so they don’t dry out while baking. That is not good–I add a touch of olive oil as a light spray mist over the noodles as well to prevent drying.  If you do not have a spray, consider a bit of olive oil drizzle:)

10. Sprinkle the remaining shredded Mozzarella on top.

11. Bake at 350 degrees for 30 minutes. Remove the dish from the oven and garnish it with more fresh basil.

Enjoy!


Before the Oven, Caprese Lasagna Roll Ups